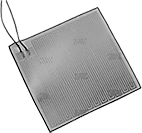
DIY Heat pad

More cleverness from Taro Ishikawa. Instead of buying a homeothermic heating pad for surgeries (these often cost > $1000), Taro used some basic industrial process control items. He bought his stuff in Japan, but similar items are available from McMaster-Carr in the US.
Part 1
A Precision Programmable Temperature PID Controller, about $200 (shown at top of post)
(Example McMaster-Carr item: 38615K71)
This connects to a temperature probe and a heating element to maintain a pre-set temperature. They’re built with fairly robust feedback algorithms and logic to maximize stability.

Part 2
A temperature probe, about $20
(Example McMaster-Carr item: 9251T91)
Pretty basic.

Part 3
A heating pad, about $50
These are available in a variety of sizes.
(Example McMaster-Carr item: 35475K722)
Just make sure all the parts are electrically compatible. Depending on which ones you select, you may also need a power supply. (The standard Labrigger disclaimer applies.)
We’ve been using this technique for a while in lab for rodent surgeries. Note two issues that can crop up: (1) 60 Hz noise precludes electrophysiology, and (2) many heating pads that you might buy, e.g., at a drug store, have quite un-even heating, which can also become worse with time it appears… I’m excited about the McMaster heating pads – perhaps they’ll be of a higher quality.
You can use DC for power supply, as I do, to get rid of the 60Hz noise.
I am grad student in a poor lab and we really couldn’t afford a homeothermic heating pad. So I was so excited to find this post….however we order all the parts and hooked it up but the pad will not turn on. Everything else seems to be working correctly the probe detects the correct temperature and the alarms go off when it is not at the set point. Do we need another piece in between the PID controller and the warming pad. Maybe a steady state relay??
Is the power supply for the heat pad rated high enough to drive it? Matched for voltage and wattage? Have you explored the settings for the PID controller and made sure it’s operating as you expect?
I wouldn’t use relays at all. Try to find a PID controller with a linear output otherwise you’ll have trouble keeping the blanket at a constant temperature.
It so happens that I just built one of those myself, you can check my blog and see if you find anything that I have done differently:
http://mousevr.blogspot.co.uk/
I built a similar device to control the temperature in brain slice recording chamber. My temperature controller has a built-in power supply (SMPS, I suppose), and I used an additional 12V DC supply to power the heating element (nichrome wire). However, I have a lot of mains noise that interferes with the recordings. How can I reduce the noise?
Thanks.
We’ve been making these using DC in a manner similar to what Lukas did. We use simple computer power supplies to provide 24V DC (there is a -12 and +12 rail) and hook these up with a DC relay to the PID.
We use DC PIDs and a relays from Auberins (~$55 Total)
Relay:
http://www.auberins.com/index.php?main_page=product_info&cPath=2_30&products_id=8
Heat Sink:
http://www.auberins.com/index.php?main_page=product_info&cPath=2_30&products_id=244
PID:
http://www.auberins.com/index.php?main_page=product_info&cPath=1&products_id=132
a 50W (24V DC) silicone blanket from McMaster:
http://www.mcmaster.com/#7945T65
but look here for other options:
http://www.mcmaster.com/#heat-blankets/=ii5kjv
and a thermocouple from Omega (great company that provides lots of great tools and probes for various measurements):
http://www.omega.com/pptst/5LSC_5SRTC.html (I use the 5LSC variants, but a lot to choose from)
Here is an extender cable for the thermocouple if you need it for your space:
http://www.omega.com/ppt/pptsc.asp?ref=TEC_REC_GEC&ttID=TEC_REC_GEC&Nav=
I like these ATX power supplies (Thermaltake 430W ~$45):
http://www.newegg.com/Product/Product.aspx?Item=N82E16817153023
But you can find similar supplies for ~$25, or take one out of an old computer you want to surplus.
These blankets work quite well for us, but under certain conditions the relay switching can create small noise transients (shielding the relay with copper worked for me, but I’m sure this could be improved). I also stress that people in the lab run the auto-tune feature of the PID every few weeks or so, you don’t want some weird set of parameters to generate an oscillation.
Using computer power supplies are great for a variety of applications, but be sure you short the green wire to ground. This connection is what is triggered by turning a computer on. Here is a pinout for the current standard 24 pin connector: http://pinouts.ru/Power/atx_v2_pinout.shtml
I’ve been laser cutting boxes using modified Makerbot templates (http://www.ponoko.com/design-your-own/products/makerbot-designs-for-acrylic-4389), but I think Lukas did a good job with his box.
cdeister: this looks great – do you happen to have a pic of the final setup? just curious about the details of hookup, etc. thanks.
I would also be interested in the setup/hookup of the cdeister design and to know if it can be used with electrophysiological experiments.