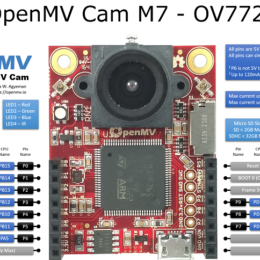
OpenMV – Fast and easy machine vision
OpenMV is an open source machine vision system. It’s designed to be easy-to-use, with a gentle learning curve. They want this to be the “Arduino of Machine Vision”. The software IDE is free…
OpenMV is an open source machine vision system. It’s designed to be easy-to-use, with a gentle learning curve. They want this to be the “Arduino of Machine Vision”. The software IDE is free…
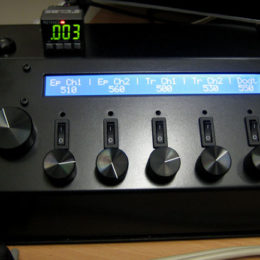
I was cleaning house a bit, and among my old files I found this, which might be worth sharing. Years ago I made a centralized power supply for a custom 2-photon imaging system I built. There…
It’s a microcontroller built into a breadboard. Actually, TWO microcontrollers. Both are Arduino-compatible. ATmega16U2 and ATmega328P.
It comes in both black, white, and pink because style matters.
P.S. The bottom side is…
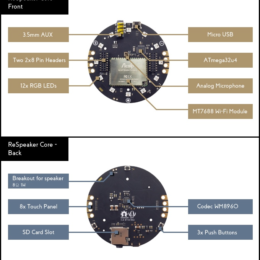
In an earlier post, we discussed how surprisingly useful well designed voice control can be. There are open source software solutions for voice control, but they aren’t integrated with hardware, and there wasn’t really a kit to help one get started. Now there is.
Here’s an open…
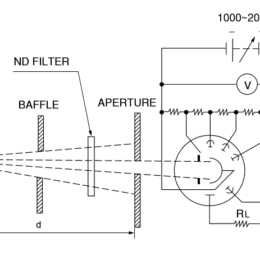
PMT performance can degrade over time. A friend asked mine recently ask for suggestions on how to check PMT performance. In a prior post, I mentioned that the Hamamatsu PMT Handbook talks…
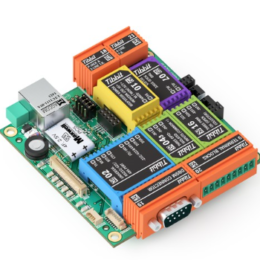
Tibbo makes modular microcontrollers, with plug-in modules for I/O ports (e.g. DB9), relays, sensors, digitizers, etc. They have different sizes, the largest of which is available as a Linux version.
…
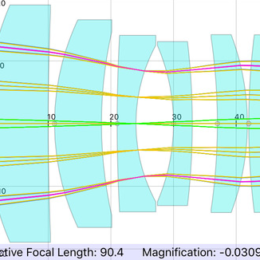
RayLab is an iOS app (iPhone/iPad) for optics analysis. It has some nice features– more than I expected. It’s a nice piece of work! For many practical applications it cannot replace conventional optic design software…
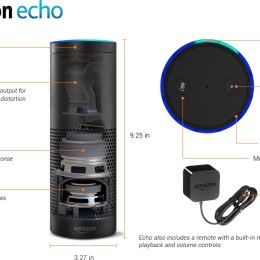
Voice control has just recently become interesting to me. Ikuko bought me an Amazon Echo and I’m surprised at how useful I find it. I’m also surprised at how well it works– it can…
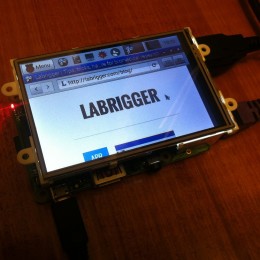
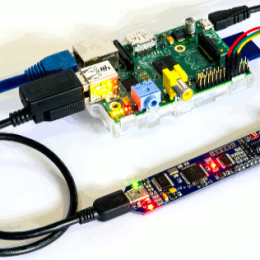
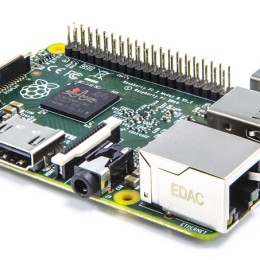
Labrigger has been experimenting with Raspberry Pis. We still find a lot of uses for Arduinos for little jobs around experimental rigs. Their simplicity and predictable performance (no background processes) make them easy to implement…
From Benjamin Judkewitz:
I needed an IR viewer to see a Ti:S beam and was really surprised to find that most viewers still sell for > 1000 € (or $). Visualizing NIR used to be…
Embrio isn’t completely open. They want to sell $50 licenses. Let’s get that out of the way first. However, it is an interesting alternative for programming Arduino hardware. It’s a visual programming environment, like…
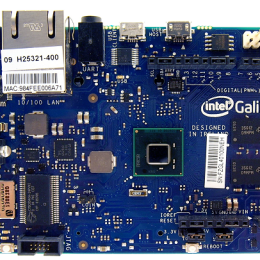
The Intel Galileo is an interesting mashup. It’s Arduino compatible. You can hand it to an undergrad and they can download the Arduino IDE and program it on their own with relatively little training….

Austin Blanco has designed and built an open-source system for controlling complex imaging systems called TriggerScope. It’s highly customizable out of the box, and both the firmware and software are open.
One can use a Raspberry Pi as a highly customizable 20 MHz scope with this cute little BitScope Micro. (about 120 euros, from the OE store)
They have …