Vendors, please sort the measurement list
Posted in Tips
Dear Vendors with Product Search Interfaces,
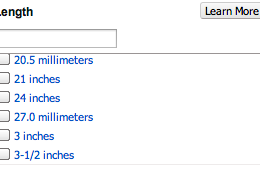
This list of measurements is complete nonsense. It’s sorted alphabetically, not even numerically (numbers are treated as letters). That’s why “24 inches” comes before “3 inches”, with “27.0 millimeters” in between. It’s not hard to fix. Convert all of…